 Home |
Some of my Plane. Mostly 9 ½s and look alike. Planes - New and Old |
Index Stuff Other Tools Forms Rebuilding Taper info |
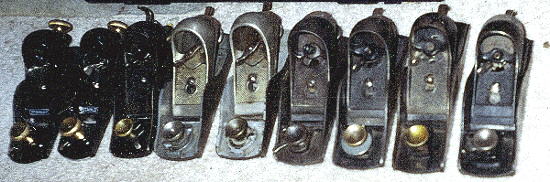
| I admit it. I've got too many planes. I can't help stopping at every stall in the flea market that carries used tools for a look see. After I got into rod building my habit only got worse. Stopping by the local home improvement stores over the course of a year I ended up with both a new low angle and regular block plane. I'm happy to report that I've done a fairly good job of removing the temptation. That is... I now own all the available cheep block planes that are useable for rod building. |
| Unlike a screwdriver, saw, or hammer, the block
plane is a complex tool. By that I mean they
requires some understanding of how they work, how to adjust them
and how to make them work better.
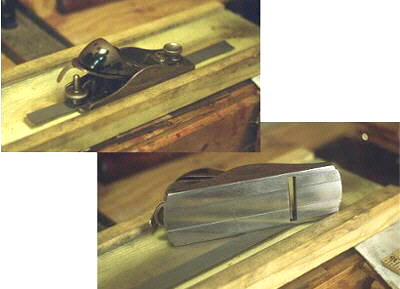
The term "Block Plane," when applied to rod building generally means the Stanley 9½ or it's later relatives. Beside Stanley, Record, Lie-Nielsen and several other makers build Block planes. Sears and other outlets often sold versions of this plane under their own names. They all have the following in common. 1. They can be comfortably used with one
hand. Most of the planes have the blade set at between 20 and 25º , with the angle of the blade ground to about 30 degrees. Some of the planes (referred to collectively as 60½) have blades set as low as 12º. These planes are not usually useful for rod building because the low angel will tear the long, thin bamboo fibers. (I do have a new Stanley low angle that seems to work very well, with a very steep blade angle.) Let's look at a 9½ block plane. The
terms used to describe the parts are fairly self explanatory,
but different people call some parts different names. I
want to give you a list of the terms I'll use. In
some cases I've seen the same part called out by another name,
but in all cases I'm using a term I've seen before. |
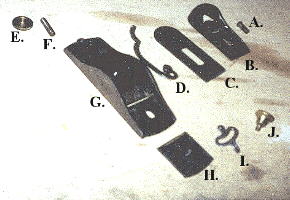 |
A. Cap screw |
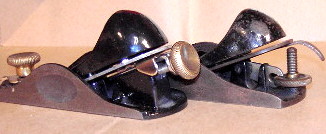
| There are two basic in and out adjustment
designs. The lever action has a lever with teeth on the top
that fit in groves in the bottom of the blade. The
lever is held in place by a horizontal pin that's centered under
the teeth. A knob that's set on short, threaded rod at
the back of the plane controls the lever. Screwing the knob up and
down moves the blade in and out.
The second way the blade moves in and out is by an endless screw that runs parallel to the blade. Some kind of "truck" fits into the bottom of the blade and attached to the endless screw. Turning the knob on the back of the screw moves the truck (and the blade) in and out. |
The plane on the left has the new endless screw adjustment and the one on the right has the older lever style. |
| Both types have some kind of horizontal lever that will adjust the blade laterally in the opposite direction the lever is moved. The whole thing is usually held in place by a screw that goes thought the cap iron into the body. This screw can be adjusted to make the adjustments very tight or very loose. (Tight might not be right. Wayne Cattanach says he leaves his as lose as he can.) |
|
 |
||
There are a few other things you should know about block planes. For example not all block planes have an adjustable throat. The Stanley 110 is a example. While useful for a few rod building jobs, they won't do for final planing. A Block plane should fit your hand, be adjustable and light enough not to tire but heavy enough to stay on top of the strip. The following table has information on some of the planes I own. |
|||
|
|
LENGTH OPEN | THROAT OPEN |
THROAT CLOSED |
WIDTH | WT. |
| ? | 7 in | .161 | .050 | 1 7/8 | 22 oz. |
| Stanley | 6 5/16 | .136 | .042 | 1 7/8 | 20 oz. |
| Sears | 6 1/2 | .276 | .075 | 2 | 23 oz |
| MILLER FALLS | 6 1/2 | .245 | .135 | 1 15/16 | 22.5 oz. |
| ? | 6 1/4 | .273 | .056 | 2 | 25 oz. |
| New Stanley | 6 3/8 | .245 | .000! | 2 | 27.5 oz. |
| You can see that most block planes will be between 6 1/4" and seven inches long, by 2 inches or less wide and weigh about 1 1/2 lb.. Which one is right for you depends on things like the size of your hand and how you hold and use your plane. Some planes just work better for me then others |
| Home |
Index
Stuff you need Forms |