|
|
Index
Stuff Forms Planes Tapers Tools |
| Many
people
will tell you that you can't change the taper of an existing
bamboo
rod, but I believe you can. I've re-built many bamboo rods that
were in
such bad shape attempting to repair or refinish them was out of
the question.
Most cases involved rods that had broken tips, missing ferrules
destroyed
cork grips or other such disasters. One was a "G.I.
Japanese"-- one
of the rods that were bough in Japan by American servicemen
between the
end of the second world war and the late '50's. Some were
made of
separate pieces that I've been able to fit
together.
In the process I've learned the importance of proper ferrule
seating and
a bit about taper design.
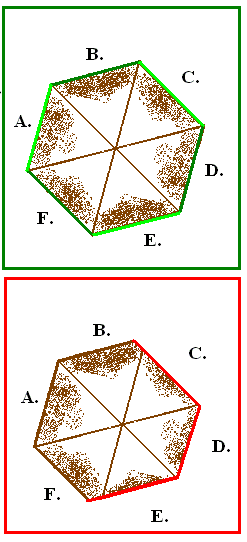
Bamboo is such that the more powerful fibers are along the outside of the bamboo wall, just under the outside enamel coating. The closer to the inside of the bamboo stalk the more "Pith" is found. Pith is a kind of spongy material that doesn't lend strength to the bamboo. The power fibers actually get shorter and fatter the deeper you go into the wall of the stalk (or culm). Depending on the individual culm of bamboo the change form "power fiber" to pith can be very noticeable or very gradual. Most bamboo rod sections are six equilateral triangle strips glued into a hex shape. The individual strips are usually glued with the outer side of the bamboo -- the strong side -- out. Most of the "Golden Age" bamboo rods were 9 ft long and made in three sections. Most modern bamboo rods are between 6 1/2 and 7 1/2 ft long and may be only two sections. To reduce a 9 ft 3p rod to a 71/2 ft 3p rod requires removal of 6 inches from each section. You only have to think about this for a second to see that the smooth taper that exists would suddenly have two rather large "Jumps" in it. (Remember, we're talking in thousandths of an inch.) To build a taper that won't make the fly rod cast like a club, the taper of the sections will have to be changed. Bamboo rods are stronger on the outside and weaker toward the center, so the ideal way to change the thickness of each section would be to remove material from the inside. This is impossible because the rod is already glued up. The only choice left to me is to remove material from the outside. Most rod builders will go to great lengths to insure the best power fibers (those along the outside of the wall.) are preserved. Almost any tip section will be made up of bamboo that had a wall so thick that after planing to size, the entire section is made of power fibers. It is possible to remove the outer layer of power fibers without OVERLY weakening the section. (Any removing of material for the outside of the rod will weaken it more than removal from the inside). What this means is that of two rod sections that are identical in dimension, one that has been made from the inside will be more powerful than one that was originally larger but had material removed from the outside. The trick is to judge how much excess to leave for each section, to make up for the best fibers that I'm removing. Normally 10 to 30% over the size of the taper I'm copying will do the trick. What's really amazing is that, on a three piece rod, the tip section is the least critical as far as changing the taper. That's because to change the taper of a .060 flat to flat tip 10% you're only removing .006 of bamboo or .003 inches from each side. Very good power fibers will usually extend at least .025 into the strip. On the other hand, a butt section might be .300 of an inch thick. Ten percent of that is .030 or .015 on each side. Fifteen thousandths is over half of .025. The thicker the rod, the less you want to remove to get to your goal. |
| To remove the material evenly, I use a set of special
tools I designed.
I spend most of the time trying to judge how to reduce the rods dimensions. I create a worksheet that looks something like the work sheet below. |
|
21 July 2001.
|
| Notes on the
table.
The longer I do this sort of thing the more I realize I need to document everything. I now make sure I put down the section name, (Tip, mid, or butt.) the rod name; if it has one, the date and any other information about the rod that I'm likely to forget. (I have pages of tables that give no clue as to what rod I was working on or even when!) Sides A, B, and C, are "before" dimensions of the rod section. They are combined to make the AVG column. DIFF is the difference between TARGET and AVG. This tells me how much I've got to "play around with." Notice the first three stations are the same as my target. I can leave them along. The last two columns are two ways to figure the extra bamboo you'll be leaving as an additional safety factor. The first. ADD 10% is created by taking 10% of the difference and adding it to the target rod section. The last column is arrived at by adding .001 to each station. (.001 to the first, .002 to the next .003 to the next and so on.) If you compare the two columns, you'll see that the numbers in the first column are smaller than the numbers in the second column. This can be true of most re-builds, but remember that the DIFF column is made up of two tapers that may not have the same "hinges" and strong points in them. Some dimensions at one station may actually cancel out each other. This has to be taken into consideration. Eventually it gets down to trial and error. Tape on the guides and see how it casts. |
| These are a few things I've learned the hard way. I'd go as far as suggesting that they may be some of the most important things to learn about bamboo rod building. I had a "perfect" rod break on me because I didn't use the right size ferrules. I've also had rods snap because I used a formula to place the snake guides and didn't make a simple test to see if I had too much stress between two of the guides. |
 |
Always leave as much power fiber under the ferrule as you can. (ask me how I know this.) |
| Guide
Spacing
Guide placing seems like it should be a straight forward process. You create the guide spacing with some formula. Maybe add 3/4" to the spacing between each guide, as you go down the rod. You start with the first guide at about 4 ½ inches from the tip and place the next one 4 ½ + 3/4" from the first one. Keep adding 3/4" to the spacing until you've placed all your guides and you're done. Wrong! This works fairly well with graphite, but this is one place where bamboo is fussy. Look at the rod on the left. The difference between guides 1. 2 and 3 may be fine for some formula, but the bow at A2 is much grater than B2. That's putting a lot of stress on the tip between guides 1 and 2! The rod on the right has the same amount of space between the line and the rod at A B and C. The force on this rod is more evenly balanced, both for fighting a fish and casting. I've found that the distance between the second and third guide is often different than the formula I used would have it. I've also found that the spacing across a ferrule is usually too short |
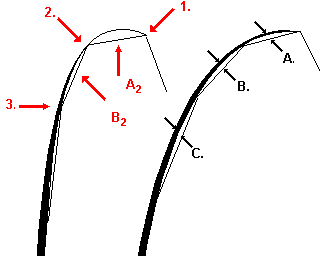
How to do it. Tape (or use rubber bands made from surgical tubing) the guides to the rod. Put a line on the rod and put a bow in it. Look at the space between the line and the rod. Adjust the guides and try again. It doesn't have to be perfect. You'll see the problems without any trouble.
|
| That's about all there is too it. Just remember, you
can
change a taper of an existing rod. But you have to give it a
lot
of thought before you do. I'd suggest more, not less
safety
factor, especially around hinges and ferrules.
And please, don't go doing this to any old Leonards or other good rods. And don't try to pass this stuff off as original tapers, like I know one guy is doing on E-bay. |

Home |
Index
Stuff Forms Planes Tools |
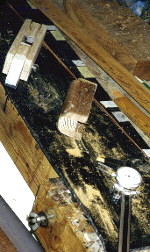 I
try to select
rod sections that are the same color and as close to my target
size as
I have. I examine each section for problems like strip
separation.
I remove any hardware/wraps that are left on the section. I
check
if ferrules are pinned. Some ferrules and guides end up in
the spares
bin, while others end up in the trash. I use a citrus based
stripper
to remove old varnish. (Michael Sinclair's book, Bamboo
Rod Restoration
Handbook, gives a very good explanation of this
process. If you
can't get a copy, the process is fairly simple. Completely
cover
the section with a citrus based striper. Watch for the
varnish to
start letting go. This can take from five to 20
minutes. Wash
varnish from the strip using the Green scrub pads found in the
cleaning
section of your grocery store. Make sure you work is dry,
when you're
done.) At this point I inspect the section again. It's
not
uncommon for the heat used in removing ferrules and tip tops to
make older
glues give up the ghost around the tip or butt. If this is
the case,
I open the sections as wide as I can, without damaging them.
I remove
the old glue and use a dubbing needle or a small straight pin to
cover
all the inside sections with glue. I bind these
sections by
hand, then tie off and let them set over 24 hours.
I
try to select
rod sections that are the same color and as close to my target
size as
I have. I examine each section for problems like strip
separation.
I remove any hardware/wraps that are left on the section. I
check
if ferrules are pinned. Some ferrules and guides end up in
the spares
bin, while others end up in the trash. I use a citrus based
stripper
to remove old varnish. (Michael Sinclair's book, Bamboo
Rod Restoration
Handbook, gives a very good explanation of this
process. If you
can't get a copy, the process is fairly simple. Completely
cover
the section with a citrus based striper. Watch for the
varnish to
start letting go. This can take from five to 20
minutes. Wash
varnish from the strip using the Green scrub pads found in the
cleaning
section of your grocery store. Make sure you work is dry,
when you're
done.) At this point I inspect the section again. It's
not
uncommon for the heat used in removing ferrules and tip tops to
make older
glues give up the ghost around the tip or butt. If this is
the case,
I open the sections as wide as I can, without damaging them.
I remove
the old glue and use a dubbing needle or a small straight pin to
cover
all the inside sections with glue. I bind these
sections by
hand, then tie off and let them set over 24 hours.