|
The first step to composite forms |
Index Stuff Other Tools Planes Rebuilding Taper info |
| When
I first read Wayne's book and considered building a set of forms
for myself, I was concerned about the use of metal. I
hadn't worked in metal and wasn't sure I could be accurate.
Later I learned that a lot of rod builders started with wooden
forms and many still use them. I considered my level of
expertise and could see that I'd probably butcher a set of wooden
forms in short order. (Practice makes this less
likely. It was the practice I was worried about.) My
solution was to build a set of composite forms using material I
had easy access to. All the material in this list came
from a hardware store, a home improvement store or a hobby shop.
There are two basic ways to built composite forms. Both are based on wooden forms. The addition of a metal planning surface adds durability. For the metal surface I've used both aluminum and steel. Both have their strong points and drawbacks. You'll find working with aluminum is different than working with steel. In some ways aluminum is easier to use, but it binds and fills files easier than steel. If I could get square edged steel strips I would go for them. Unfortunately most of the steel strips I found lately were beveled on the edge, meaning a lot of work (or a trip to the machine shop) to get the square edge you need for the "V." |
The basic wooden form
| I'm assuming you're making 5 ft forms. You'll have to adjust of other sizes. |
Material I used:
2 - 1" x 2" x 6' milled red oak |
| Tools I used: | |
| square 1/4 chisel saw at least 4 3" clamps adjustable wrench screwdriver. drill press drill bits drill vice or drilling jig * hobby miter box and saw |
hammer small file course triangle file. block sander sand paper dial caliper depth gauge router ** V making tool * V making file * |
| *( You'll make these.) **( not needed for the first design.) | |
| Stuff to make |
| The tools you can't buy really are easily made. They'll
only take a little while to build and once built, will last
forever. -drill jig -V making tool (for the metal "V" grove) -V making file |
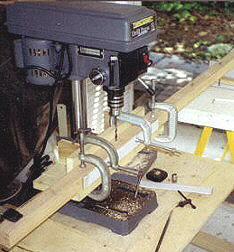
| Cut 12 lengths of 9/32 copper tubing
and 12 lengths of 5/16" about 1 3/8" long. Put the 9/32" in
the 5/16" for support. Put a 5/16" drill in your drill press
and line up your machine vice or jig so that the 1" x 2" is
longitudinally centered (on it's side) directly under the
drill. Clamp both sides of both pieces to the drill press so
that the bit falls app. 2" from the end of the work. After
you've drilled the first hole place one of the 1 3/4" long tubing
through the hole to keep everything lined up. Move the work
5" and repeat. Continue to do this until you've come to the
other end of your forms. You should end up with 12 5/16" holes,
starting 2" from one end and ending 3" from the other. This
is the "pull" of the form
Now separate the two boards, remove the tubing and set it aside. Replace the 5/16" bit with a 1/4" bit and drill holes in one of the 1 x 2's app. 1" from and in line with the first hole. You can put the holes on either side of the original holes, it's up to you. This is the "push" side of the form. |
|
| You now have two strips of 1x2 5 ft long. One has a 5/16" hole drilled square through it every 5". The other has a matching set of 5/16" holes and has a set of 1/4" holes next to the 5/16" holes. |
 |
Now place the inside of the "push" side of your form (the one with the 1/4" holes) face up on your work surface. screw a 1/4" nut on a bolt until about 1/2" of thread is extending through the nut. Place the screw in the first 1/4" hole and draw around the outside of the nut. Repeat for the other 11 holes. When you remove the screw and nut you'll have an outline of the HEX shaped area you want to remove to counter sink the nut. Use the 1/4 chisel to create a hex shaped hole just deep enough to hold the nut. |
| Put a wing nut, lock washer, and washer on each machine screw push them into each 1/4" hole from the outside. put a nut on the inside and screw it into the hole. You've now completed the "push side. |
 |
| Use a "hobby" or jewelers file to file a "V" in the each of the
head of the 12 - 2 1/2" bolts or machine screws.
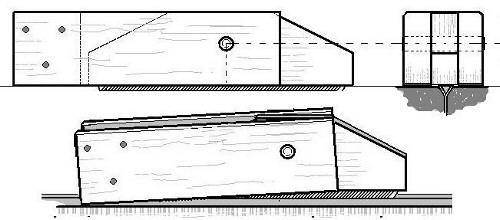
Now cut all the lengths of 5/16" tubing in half. Put one piece in each hole. put the 9/32" tubing over the 1/4" bolts (or machine screws). Push the bolt through both form half's from the "push" side. Put a washer, nut, lock washer and wing nut on the bolt. Continue until you've completed filling all the 5/16" holes. Hammer a small brad into the "V" you filed in each bolt. This will keep the bolt from turning on you as you tighten the forms.  Exploded cross section of the form (not to scale) If the 5/16" bit you used is truly 5/16", you now have a set of
planing forms that should be tight. |
Adjusting the forms |
A look at Composite planing forms

HomeIndex
Stuff
Other Tools
Planes
Rebuilding
Taper info
 I chose this material because it was the most likely to be flat
and square.
I chose this material because it was the most likely to be flat
and square.