Home
V-tools
Surface form
Inlayed form
Solid surface Composite Forms
Index
Stuff
Other Tools
Planes
Rebuilding
Taper info
My original forms used Solid surfaces mounted on the top and bottom of the forms.  The problems I encountered were:

-Mounting  I finally came up with a way of attaching the two strips of ¼ x 1 inch aluminum.  I took my forms apart and clamped one side, face up, against the jig I'd made for my drill press.  Then I clamped the Aluminum strip to both the jig and the top of the form.  I drilled and screwed all the holes, then went back and counter sunk the aluminum.  The top of each screw is between .005 and .01 inches below the surface of  the aluminum strip.  I repeated the same procedure for each face.

-Surfacing  There's no doubt about it.  Surfacing is a slow process.  The object is to get both sides of the form not only flat, but also in line with the adjustment bolts.  It's a slow process.  I used a magic marker to mark all over the top of my forms.  Then I used 200 grit wet and dry backed by a piece of 1 x 4 hardwood about 1 ft. long.  I kept the long axis of the sanding block in line with the long axis of the forms.  I could judge my progress by the amount of magic marker ink that was left on the surface of the forms.  You have to sand DOWN to the low spots in the form.  Remember,  you want the top of the form parallel with the adjustment bolts.  I don't recommend using power tools for this.  they cause more problems.

-Creating  the V grove  The surfaces were made out of 2 pieces of 1/4 x 1" aluminum strips, bought at a local home improvement store and cut to length.  I had originally looked for steel but was unable to find any locally that did not have beveled edges, making it unsuitable for creation of the V grove.

I used two tools to create the V grove.  the first is taken form Jack Howell.  He describes the tool in both his book and an article in  The Best of the Planing Form.

My V-Grove Tools
I made mine from two pieces of 1 x 2" hardwood about 6" long.   The cutter blade is made from a 60º  machine tool used to create bolts.  The blade is held in place between the two sides by 1/2 x 2" wood with pieces of rubber inter tube, from a bike tire, to act as a cushion.  The cutter blade has to be square and  extremely tight.  I use 1/4 bolts for the pins and wing nuts to tighten.  You can move the point of the blade in and out by loosening and tightening the wing nuts.  Make sure everything is square!


I set the forms so that one end is about .025" closer then the cross section of the cutter bit on my tool.  I set the other end to about .090" less then the cutter.

I pull the tool rather then push it along the grove.  I've found that on aluminum it's best to revers the direction of my cut on each pass.  This prevents chipping and gouging.  I work from the shallow end to the deep end.  I take a lot of measurements.   Even aluminum takes time.

The second tool is also taken very loosely, from an article in The Best of the Planing Form.

I use this tool to smooth and finish the form.  It's made like other tools that a hold a triangle file to a flat piece of wood.  The exception is it's built with a pair of outriggers to hold it level no matter how high the wood "foot" is above the form.  .


The bottom has to be flat and the back square.
The Forms
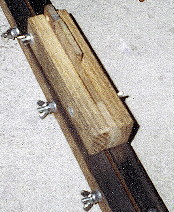
So far all my forms have a complete metal surface on the top and bottom.  It's fairly easy to do while your making your forms.  Before you join the two halves together simply attach the top and bottom aluminum or metal strips to each half.  (Start by keeping everything square.  Use lots of clamps to hold the work in place.  Make sure the inside of the form lines up with the inside edge of the metal surface!) counter sink Flathead screws (I used 10 x 1" but you can get way with 8 X 1" if you'd like.) 

I drilled the hole then screwed in each screw, one at a time.  Then I removed one screws at a time, counter sunk the hole and replaced the screw.   It takes a little longer but I know my work is going to line up.


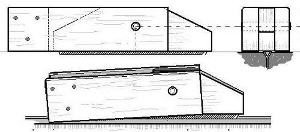
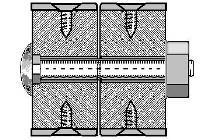
A cross section of my composite forms. 
Note that the flathead screws are counter sunk.
After you have one side complete, repeat the steps to the other side of the form.  Then  join your forms together and flatten them.  After you're satisfied that the top and bottom are parallel to the adjustment screws your form is ready for the V-grove.
An Inlayed form.
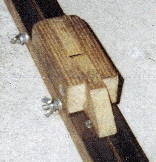
One of the thoughts that has crossed my mind is the fact that the V-grove is a lot easier to make in wood than in metal.  What I'm thinking about now is "inlayed forms."  The picture shows what I'm talking about.
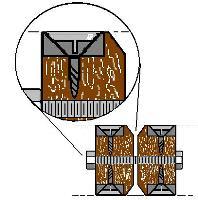
Normally each half of a form made from hardwood, as I make mine, is about 7/8" wide.  Quarter inch aluminum is available from several suppliers. 

It should be possible to use a router to carefully rout a 1/4"x 1/4 " slot along the outside of the form, then inlay the aluminum.  Once again, you'd have to countersink the screws.  After the strips and the form were assembled,  the top and bottom could be flattened and the V-groves cut.

At this time I haven't made any forms like this.  Maybe I will in the future.


What's all this about Re-building?

Home
Index
Stuff
Other Tools
Planes
Rebuilding
Taper info