Selection, splitting and staggering.
Step two
Straightening
Step threeBasic Beveling

m
 m fly rods
Heat treating
Step five Hand planing 1
Hand planing 2
Step sixHand planing 2
Gluing & binding
Step sevenFinal dimensions
Step eightAttaching hardware
Step nineWrapping
Step tenFinish
Rod sock and tube
Step 12 Shipping and
Customer care.
home
"Time is of the essence." that's a legal
term, but it's just as true about gluing. Here's another place
where you can start an argument with rod makers. Everyone has
his/her favorite glue. There are a whole host of glues
that will work for bamboo fly rods out there. Each has
it's own characteristics. Harry Boyd had tested some and says that
he actually found different glues would make rods more or less
stiff!
Glues include everything from the traditional hide glue to the latest
space age epoxy.
Bamboo fly rod glues need the following characteristics: Hold both face to face and shear, be reasonably water resistant (a good finish can protect glue from water for a shot period of time, but the glue must be able to hold its own when dunked.), be easy to mix and store, and have a good working time. The last item can be a challenge.
I've used everything from Elmer's wood glue to T-3 epoxy. My favorite all around glue is Titebond III, which is fairly waterproof (So they say). Before that my favorite was Titebond II extended, which was "water resistant," which meant that you could dunk a rod without worry. Just don't leave it submerged for extended periods of time. I like Titebond because I don't have to mix it. Years ago I mixed some two part epoxy and ended up with a mess that never hardened. Epoxy is also hard to clean, while Titebond cleans up with water. I've had no failures with Titebond so for the time being I'll stick with it. (was that a pun?)
I remove the waxed paper, then it's time to straighten. I do this any way I can. I use a wall paper seam roller, or lay the section flat on the work bench and roll the palms of my hands across it, always moving them out from the center. I sight down the section, looking for problems. Then I lay the section on the workbench, put my finger just below the problem and slowly pull the strip up while applying backward pressure on it.
Eventually the glue starts to set, once that happens, I'm fighting myself by trying to straighten further. It's time to hang it up to dry. I started with a small amount of weight at the bottom and slowly increased it to between 1 1/2 and 2 lb. (I use 1" washers for weights. They give me a lot of flexibility) Then it's drying time -- a minimum of 48 hours. This is one of the many times I can't rush the process. After the section has dried I remover the binding string and sand off any glue that's left.
Bamboo fly rod glues need the following characteristics: Hold both face to face and shear, be reasonably water resistant (a good finish can protect glue from water for a shot period of time, but the glue must be able to hold its own when dunked.), be easy to mix and store, and have a good working time. The last item can be a challenge.
I've used everything from Elmer's wood glue to T-3 epoxy. My favorite all around glue is Titebond III, which is fairly waterproof (So they say). Before that my favorite was Titebond II extended, which was "water resistant," which meant that you could dunk a rod without worry. Just don't leave it submerged for extended periods of time. I like Titebond because I don't have to mix it. Years ago I mixed some two part epoxy and ended up with a mess that never hardened. Epoxy is also hard to clean, while Titebond cleans up with water. I've had no failures with Titebond so for the time being I'll stick with it. (was that a pun?)
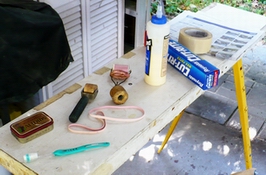 The first thing I do is gather all my tools and materials
together. It's exciting to discover that, with glue drying on the
strips, I've forgotten something and have to go find it, but that's
excitement I don't need. I should have a checklist that would
include: binder cord, threaded bobbin, scissors, work space
preparation, bucket of water, Seam
roller, wax
paper to cover the workbench and the ever useful
toothbrush. I tape newspaper to the work surface.
Over that I tape a sheet of wax paper.
The first thing I do is gather all my tools and materials
together. It's exciting to discover that, with glue drying on the
strips, I've forgotten something and have to go find it, but that's
excitement I don't need. I should have a checklist that would
include: binder cord, threaded bobbin, scissors, work space
preparation, bucket of water, Seam
roller, wax
paper to cover the workbench and the ever useful
toothbrush. I tape newspaper to the work surface.
Over that I tape a sheet of wax paper. 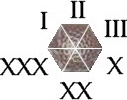 I tape the strips
together in the correct order, (see diagram at left) and tape them every15 to 18 inches, then open the section by severing each tape between two of the strips. I use a plane to take the apex off
all six strips while they're laying side by side. I remove between .002" and .003". Then I use a
toothbrush to clean out any shavings or other debris. Anything I
miss can end up giving me a bad glue line. After all the work
I've put in up to this point, it's not a good time to screw up. I tape the strips
together in the correct order, (see diagram at left) and tape them every15 to 18 inches, then open the section by severing each tape between two of the strips. I use a plane to take the apex off
all six strips while they're laying side by side. I remove between .002" and .003". Then I use a
toothbrush to clean out any shavings or other debris. Anything I
miss can end up giving me a bad glue line. After all the work
I've put in up to this point, it's not a good time to screw up.  I put newspaper on my workbench, then cover it with wax paper. I lay the work out and cover it with glue. When I took this picture, several years ago I was experimenting with Probond. One last check, to make sure everything is ready. Is my bobbin loaded and do I have about 4 ft. of thread ready to go. Are the weights in place? Is the binder drive belt ready? Do I have the right cradle? Do I have scissors, 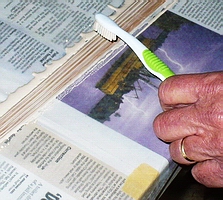 a bucket of water and my Seam roller. If I'm using the same
toothbrush as I used to clean the strips after I removed the apex, I
make sure it's clean. If I have everything ready, it's time to
open the glue. a bucket of water and my Seam roller. If I'm using the same
toothbrush as I used to clean the strips after I removed the apex, I
make sure it's clean. If I have everything ready, it's time to
open the glue.I cover the section from end to end then use the toothbrush to work it into the bamboo. then I use the back of the toothbrush to move the excess glue over the strip. I should have a lot of glue on all the strips, especially the outside of the two edge strips. When I'm satisfied that I've got "too much" glue on strips, with no voids, I throw the toothbrush into the bucket of water. |
Next I fold the strips together. I put the drive belt around the
strip twice then pull it up over the drive. I secure the thread with a slip knot,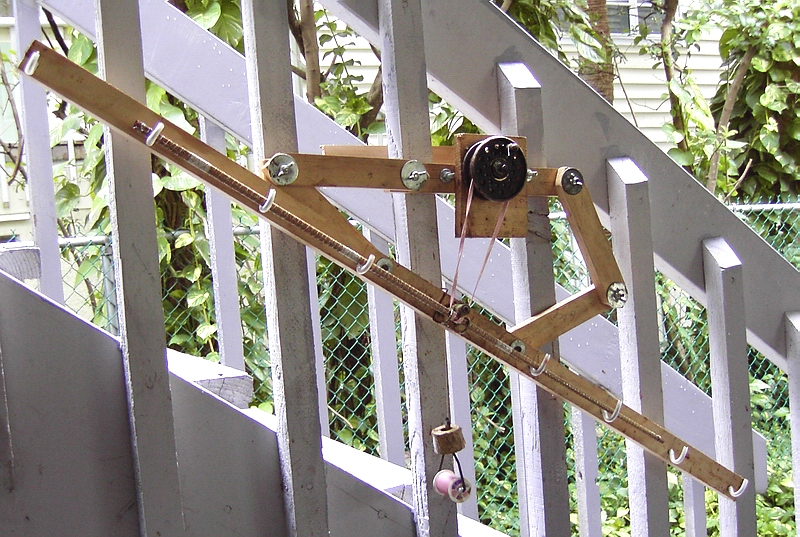 followed by two half hitches to . followed by two half hitches to .  I run the strips through the binder two times. The first pass results in a single thread spiraling down the section.  The
second time I reverse the drive belt. The results are a cross hatch
that doubles the strength of the binding thread and also reversed the
torque set up by the first pass through. the binders. The
second time I reverse the drive belt. The results are a cross hatch
that doubles the strength of the binding thread and also reversed the
torque set up by the first pass through. the binders.
|
I remove the waxed paper, then it's time to straighten. I do this any way I can. I use a wall paper seam roller, or lay the section flat on the work bench and roll the palms of my hands across it, always moving them out from the center. I sight down the section, looking for problems. Then I lay the section on the workbench, put my finger just below the problem and slowly pull the strip up while applying backward pressure on it.
Eventually the glue starts to set, once that happens, I'm fighting myself by trying to straighten further. It's time to hang it up to dry. I started with a small amount of weight at the bottom and slowly increased it to between 1 1/2 and 2 lb. (I use 1" washers for weights. They give me a lot of flexibility) Then it's drying time -- a minimum of 48 hours. This is one of the many times I can't rush the process. After the section has dried I remover the binding string and sand off any glue that's left.