Selection, splitting and staggering.
Step two
Straightening
Step threeBasic Beveling

m
 m fly rods
Heat treating
Step fiveHand planing 1
Hand planing 2
Step sixHand planing 2
Gluing
Step sevenFinal dimensions
Step eightAttaching hardware
Step nineWrapping
Step tenFinish
Rod sock and tube
Step 12 Shipping and
Customer care.
home
 Next
I fit the ferrules to size. I don't keep many ferrules on hand, so
it's important that I have a dependable source. The ferrules I buy are from a very
good manufacturer, Rush River Rods. Tony Larson's a
good guy to do business with. Fitting ferrules
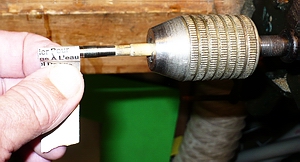
is a time consuming job, but it can't be rushed. I fit a
hand drill, crank up, in my bench vice. This gives me control
over the speed I'll be turning the male ferrule. I put a dowel in
the chuck and slip the male over the dowel. Then I use emery
cloth to size the male ferrule. I check the fit often. It's easy
to go to far, but impossible to back up! I clean the inside of the ferrule and ruff it up
Next
I fit the ferrules to size. I don't keep many ferrules on hand, so
it's important that I have a dependable source. The ferrules I buy are from a very
good manufacturer, Rush River Rods. Tony Larson's a
good guy to do business with. Fitting ferrules
is a time consuming job, but it can't be rushed. I fit a
hand drill, crank up, in my bench vice. This gives me control
over the speed I'll be turning the male ferrule. I put a dowel in
the chuck and slip the male over the dowel. Then I use emery
cloth to size the male ferrule. I check the fit often. It's easy
to go to far, but impossible to back up! I clean the inside of the ferrule and ruff it up 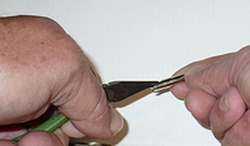 a bit.
I "crown" and then flatten the tabs on the end of the ferrules, this makes them easier to bind to the six sides of the rod. I use jewelers files and small
 all needle nose pliers. After all this I'm
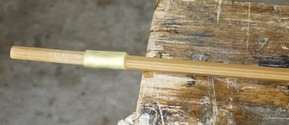
ready to fit the ferrule to the bamboo. I do this by first
getting the depth of the ferrule, then building up a masking tape wrap as a stop. I wrap a strip of
all needle nose pliers. After all this I'm
ready to fit the ferrule to the bamboo. I do this by first
getting the depth of the ferrule, then building up a masking tape wrap as a stop. I wrap a strip of 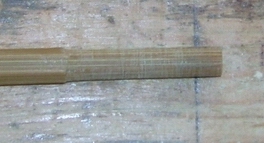 sand paper around the end of the section then sitting on
a bench I "roll" the strip back and fourth across my legs. Once
again, I stop often to check my progress. To little is much
better than, "Oops!" Eventually I get a snug fit. Then it's
time to glue the ferrule on the section.
sand paper around the end of the section then sitting on
a bench I "roll" the strip back and fourth across my legs. Once
again, I stop often to check my progress. To little is much
better than, "Oops!" Eventually I get a snug fit. Then it's
time to glue the ferrule on the section.I use a long curing epoxy called T-80 by System 3 to glue the ferrules an tip
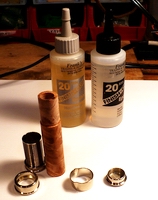 top in place.
 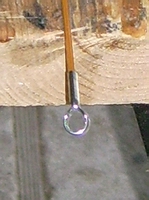 If
you've built a rod, you'll start to feel right at home
now. From here on in there are only a few variations
between bamboo and glass or graphite. Bamboo rods aren't
supposed to have splines, but they usually do. I find the side I want
my tip to to face and glue it in place. I use a good epoxy
when I assemble my reel seats.
If
you've built a rod, you'll start to feel right at home
now. From here on in there are only a few variations
between bamboo and glass or graphite. Bamboo rods aren't
supposed to have splines, but they usually do. I find the side I want
my tip to to face and glue it in place. I use a good epoxy
when I assemble my reel seats.Then I'll line up the tip and butt sections. I've cut the butt about 3/4 of an inch shorter than the tip section, because the reel seat butt cap will extend some distance into the reel seat. Next I'll find the location of the reel seat on the butt section and glue it in place with 30 minute epoxy. Bamboo rods are a little finicky because the reel seat has to line up with the correct flat, or the reel will be canted to one side or the other. I make sure the reel seat is aligned by putting an old reel in the seat as a type of "plum bob." After letting the epoxy cure for 24 hours I'm ready to ream out the cork grip and slide it into place. I use one of the gorilla glues because the reamer is round and the blank is hexagonal, leaving space between the cork and the rod. The gorilla type glues will expand to fill the voids.
Now I've got something that looks like a fly rod. I measure the locations for the guides and tape them in place with masking tape. I put a line on the rod and pull a bow in it, to check the distance between the snake guides. Any excess bend between any two guides calls for a little adjustment.
At this point I can actually cast the rod for the first time. It won't cast exactly as it will after it's wrapped but I should be able to see what I have. Any last minute adjustments are made at this point.