Selection, splitting and staggering.
Step two
Straightening
Step threeBasic Beveling

m
 m fly rods
Heat treating
Step five Hand planing 1
Hand planing 2
Step sixHand planing 2
Gluing
Step sevenFinal dimensions
Step eightAttaching hardware
Step nineWrapping
Step tenFinish
Rod sock and tube
Step TwelveShipping and
Customer care.
home

Planing the final taper, what most consider the "heart" of bamboo rod building. The taper is the slope between the butt
and the tip. It may start at somewhere around .300" at the butt
and end as .070" or less at the tip. Often this slope is not
constant. This is what gives a bamboo rod it's '"feel."
It's what makes one bamboo rod work for an individual while another
feels like a club, or a willow branch.
The process is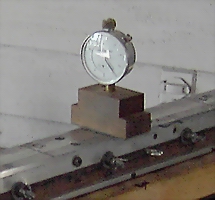 started
by using one of several methods of adjusting the planing forms to 1/2
the dimension of the finished rod. (I actually subtract .001 from
each station, for glue.)
started
by using one of several methods of adjusting the planing forms to 1/2
the dimension of the finished rod. (I actually subtract .001 from
each station, for glue.)
My forms are composite wood and aluminum/steel and use pull screws / push screws. I mark the forms at 5" intervals (That interval, established by Garrison before the 1970's when his book came out, became the standard for most rod builders today.) I write the target size between each station with an arrow pointing to the correct station. I start by loosening all my screws. then I place the depth gage on the form and start to adjust the push screw or the pull screw. My depth gage has a Plexiglass bottom and I clean it and check it against a standard I built before I start. As I reach my target I add .001" to my adjustment. If I'm going for .060", and I'm closing the forms I'll adjust the pull screw to .059". Then I'll use the push screw to open the forms .01", to my target of .060". After this I let the forms set for a few hours, then go back and check for slippage. Once I'm sure I'm on my targets, I lock everything in place and I'm almost ready to begin planing.
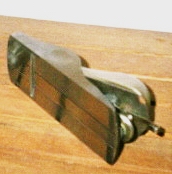
A word about planes. I got my planes from variety of sources, flea markets, home improvement stores, and yard sales. Many of them are the old Stanley 9½. All, new or old, have to be "tuned."
I use a series of planes, two bench planes and two block planes, and I end with a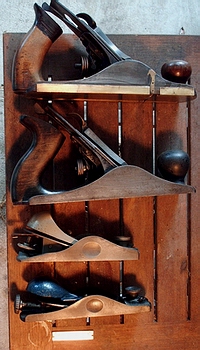 razor blade scraper. The picture at right
shows four planes and the razor blade. I start with the top bench
plane. You'll note it's been broken and repaired. The
bottom is flat and it will hold the iron as it should. I've
replaced the top of the handle and placed brass L angles on each side
to keep the blade from biting into my forms. At this point in the
process I'm just trying to get a good 60° starting angle.
First, before I begin, the Iron
razor blade scraper. The picture at right
shows four planes and the razor blade. I start with the top bench
plane. You'll note it's been broken and repaired. The
bottom is flat and it will hold the iron as it should. I've
replaced the top of the handle and placed brass L angles on each side
to keep the blade from biting into my forms. At this point in the
process I'm just trying to get a good 60° starting angle.
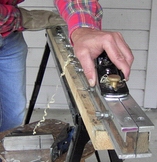
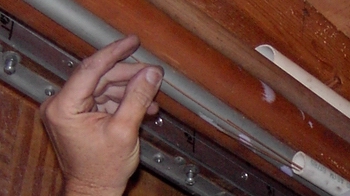
First, before I begin, the Iron 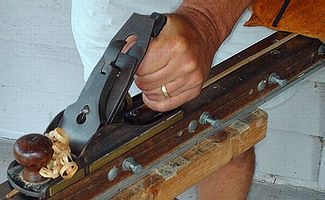 has to be SHARP! Then
I start planing with only about 1/4 of the strip in the butt end of the
form. As I start taking material off, I move the strip further
and further into the form. I usually take around 10 strokes on
each side. I'm just starting. I'll take between 50% and 75%
of the material off, before I get done. Notice the Glove on the
hand I'm using to hold the strip in the form. The plane can grab
the strip and drag it 1/4" or so. Without a glove your hand will
have a cut where you're holding the bamboo! Trust me.
has to be SHARP! Then
I start planing with only about 1/4 of the strip in the butt end of the
form. As I start taking material off, I move the strip further
and further into the form. I usually take around 10 strokes on
each side. I'm just starting. I'll take between 50% and 75%
of the material off, before I get done. Notice the Glove on the
hand I'm using to hold the strip in the form. The plane can grab
the strip and drag it 1/4" or so. Without a glove your hand will
have a cut where you're holding the bamboo! Trust me.
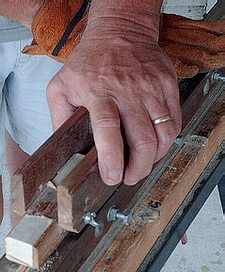 After
the first plane has done it's work, I place the strip "face up" in the
form and flatten the back. This process makes sure that both
sides of the bamboo rest flush against the planing form when I flip
them from side to side. The tool I use for this is a
sanding block, with runners on each side of the block. They keep
the sanding block parallel to the top of the planing form. (I
designed this after I read about outrigger plans for a 9 ½ block
plane. I can't take credit for being original, just
adaptive.) I'm not trying to get all the enamel off the outside of
the strip, just create a flat side. Part of the enamel will still
be on the strip. Here's where I address any problems I find with
nodes. I want the outside of the strip to lay flat against the
side of the from. Any bulges will cause problems later
on. After that I don't touch the outside of the strip until the
very last few strokes.
After
the first plane has done it's work, I place the strip "face up" in the
form and flatten the back. This process makes sure that both
sides of the bamboo rest flush against the planing form when I flip
them from side to side. The tool I use for this is a
sanding block, with runners on each side of the block. They keep
the sanding block parallel to the top of the planing form. (I
designed this after I read about outrigger plans for a 9 ½ block
plane. I can't take credit for being original, just
adaptive.) I'm not trying to get all the enamel off the outside of
the strip, just create a flat side. Part of the enamel will still
be on the strip. Here's where I address any problems I find with
nodes. I want the outside of the strip to lay flat against the
side of the from. Any bulges will cause problems later
on. After that I don't touch the outside of the strip until the
very last few strokes.
I continue with the second bench plane. It's got a .006" slot down the center of the sole. Once again the blade must be SHARP! This time I'm taking about 7 strokes a side. working the section into place on the planing form. This is where most of the actual taper is created. Each side receives attention until the plane quits removing material. This is really the make or break point for a strip. If it's not right when I get finished here, it goes into the scrap heap.
 Next comes what is called a 9 ½ block plane, either an old Stanley, or an old Sears I picked up. Both have SHARP blades
and I work to keep them that way. Each has a .003" or
.005" slot on the sole. (You can see it clearly, in the Sears
plane at the left.) These plane blades have a steeper angle. Depending on the plane it could be 35° or
40°.
Next comes what is called a 9 ½ block plane, either an old Stanley, or an old Sears I picked up. Both have SHARP blades
and I work to keep them that way. Each has a .003" or
.005" slot on the sole. (You can see it clearly, in the Sears
plane at the left.) These plane blades have a steeper angle. Depending on the plane it could be 35° or
40°.
The throat of the plane is almost closed. I'm now removing probably around .002"~.004" of bamboo with each stroke. I'll go 4 or five strokes at a time here before flipping the strip to remove an equal amount of bamboo from the other side. If need be I'll plane a problem area from the tip direction, but only if it's really necessary. Once again, when the plane quits removing material, it's done. I've now finished the basic taper.
 The
final plane I use is a low angle plane. Most makers don't like
low angle planes for the final few cuts, but I do. I ground the
blade to 40° that angle
The
final plane I use is a low angle plane. Most makers don't like
low angle planes for the final few cuts, but I do. I ground the
blade to 40° that angle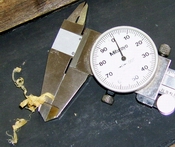 seems to lesson the tear.
I have two finishing planes, one is a Sears,
while the one at the right is a new Stanley, with a hock
blade. Both of these planes will take an EXTRA SHARP edge,
which is what I need for the last few strokes. I'm now taking off
something like .001" of material. Each side gets only 3 passes with the
plane. I'll start with the outside and take off any remaining
enamel. I keep flipping the strip until, once again I'm not
removing any material. At this point the strip is about 2 inches
from the small end of the planning from.
seems to lesson the tear.
I have two finishing planes, one is a Sears,
while the one at the right is a new Stanley, with a hock
blade. Both of these planes will take an EXTRA SHARP edge,
which is what I need for the last few strokes. I'm now taking off
something like .001" of material. Each side gets only 3 passes with the
plane. I'll start with the outside and take off any remaining
enamel. I keep flipping the strip until, once again I'm not
removing any material. At this point the strip is about 2 inches
from the small end of the planning from.
I'll slide the strip up the form till the tip is aligned with the end of the planing form,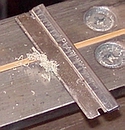 then use the razor
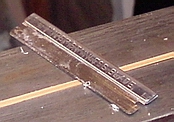 blade as my finishing scraper. (This is a trick I learned from
Tony Spezio of Mountain Home, AR. It works very well.) This
it the only time I start by working from the tip to the butt.
After I work all sides from the tip, I'll start working from the
butt. When I feel the strip is smooth, or I'm not taking any more
shaving, I quit. The picture at the left shows the amount of
shavings I might get when I first start. The picture at the right
shows the last pass I'd make on this strip.
blade as my finishing scraper. (This is a trick I learned from
Tony Spezio of Mountain Home, AR. It works very well.) This
it the only time I start by working from the tip to the butt.
After I work all sides from the tip, I'll start working from the
butt. When I feel the strip is smooth, or I'm not taking any more
shaving, I quit. The picture at the left shows the amount of
shavings I might get when I first start. The picture at the right
shows the last pass I'd make on this strip.
If you didn't notice, I've mentioned SHARP more than once. In hand planing, having a SHARP blade is probably the most important single element. Makers have to be on the lookout for tear outs. No matter how expensive the plane, or how well tuned, if the blade isn't SHARP It won't get the job done. I usually sharpen my blades every two or three strips, depending on how many passes I've made through the bamboo, more often if I think the blade needs it. Most problems I have with strips are caused by blades that aren't SHARP enough. I use what's known as "the scary sharp" system, which uses a series of wet and dry sandpaper. Both the angle edge and the back of the blade have to be shiny flat. Experiments have shown me that the 30° used on most bench planes is the correct angle for Bamboo. However Block planes can be ground up to an angle of 45° and even 50°. Each block plane seems to have a personality of it's one. Some block planes work very well at 30° while others only work at 35°. I have one cheep block plane I use as a scraper, that is ground to 70°. But once again I'll end by saying whatever the plane, the blade must be SHARP!
After I finish a strip I store it in a pvc pipe, suspended from my ceiling. That way I know I won't break it by stepping on it or otherwise abusing it.
The process is
started
by using one of several methods of adjusting the planing forms to 1/2
the dimension of the finished rod. (I actually subtract .001 from
each station, for glue.) My forms are composite wood and aluminum/steel and use pull screws / push screws. I mark the forms at 5" intervals (That interval, established by Garrison before the 1970's when his book came out, became the standard for most rod builders today.) I write the target size between each station with an arrow pointing to the correct station. I start by loosening all my screws. then I place the depth gage on the form and start to adjust the push screw or the pull screw. My depth gage has a Plexiglass bottom and I clean it and check it against a standard I built before I start. As I reach my target I add .001" to my adjustment. If I'm going for .060", and I'm closing the forms I'll adjust the pull screw to .059". Then I'll use the push screw to open the forms .01", to my target of .060". After this I let the forms set for a few hours, then go back and check for slippage. Once I'm sure I'm on my targets, I lock everything in place and I'm almost ready to begin planing.
A word about planes. I got my planes from variety of sources, flea markets, home improvement stores, and yard sales. Many of them are the old Stanley 9½. All, new or old, have to be "tuned."
I use a series of planes, two bench planes and two block planes, and I end with a
razor blade scraper. The picture at right
shows four planes and the razor blade. I start with the top bench
plane. You'll note it's been broken and repaired. The
bottom is flat and it will hold the iron as it should. I've
replaced the top of the handle and placed brass L angles on each side
to keep the blade from biting into my forms. At this point in the
process I'm just trying to get a good 60° starting angle.
First, before I begin, the Iron has to be SHARP! Then
I start planing with only about 1/4 of the strip in the butt end of the
form. As I start taking material off, I move the strip further
and further into the form. I usually take around 10 strokes on
each side. I'm just starting. I'll take between 50% and 75%
of the material off, before I get done. Notice the Glove on the
hand I'm using to hold the strip in the form. The plane can grab
the strip and drag it 1/4" or so. Without a glove your hand will
have a cut where you're holding the bamboo! Trust me.After
the first plane has done it's work, I place the strip "face up" in the
form and flatten the back. This process makes sure that both
sides of the bamboo rest flush against the planing form when I flip
them from side to side. The tool I use for this is a
sanding block, with runners on each side of the block. They keep
the sanding block parallel to the top of the planing form. (I
designed this after I read about outrigger plans for a 9 ½ block
plane. I can't take credit for being original, just
adaptive.) I'm not trying to get all the enamel off the outside of
the strip, just create a flat side. Part of the enamel will still
be on the strip. Here's where I address any problems I find with
nodes. I want the outside of the strip to lay flat against the
side of the from. Any bulges will cause problems later
on. After that I don't touch the outside of the strip until the
very last few strokes. I continue with the second bench plane. It's got a .006" slot down the center of the sole. Once again the blade must be SHARP! This time I'm taking about 7 strokes a side. working the section into place on the planing form. This is where most of the actual taper is created. Each side receives attention until the plane quits removing material. This is really the make or break point for a strip. If it's not right when I get finished here, it goes into the scrap heap.
Next comes what is called a 9 ½ block plane, either an old Stanley, or an old Sears I picked up. Both have SHARP blades
and I work to keep them that way. Each has a .003" or
.005" slot on the sole. (You can see it clearly, in the Sears
plane at the left.) These plane blades have a steeper angle. Depending on the plane it could be 35° or
40°.The throat of the plane is almost closed. I'm now removing probably around .002"~.004" of bamboo with each stroke. I'll go 4 or five strokes at a time here before flipping the strip to remove an equal amount of bamboo from the other side. If need be I'll plane a problem area from the tip direction, but only if it's really necessary. Once again, when the plane quits removing material, it's done. I've now finished the basic taper.
The
final plane I use is a low angle plane. Most makers don't like
low angle planes for the final few cuts, but I do. I ground the
blade to 40° that angle seems to lesson the tear.
I have two finishing planes, one is a Sears,
while the one at the right is a new Stanley, with a hock
blade. Both of these planes will take an EXTRA SHARP edge,
which is what I need for the last few strokes. I'm now taking off
something like .001" of material. Each side gets only 3 passes with the
plane. I'll start with the outside and take off any remaining
enamel. I keep flipping the strip until, once again I'm not
removing any material. At this point the strip is about 2 inches
from the small end of the planning from.
seems to lesson the tear.
I have two finishing planes, one is a Sears,
while the one at the right is a new Stanley, with a hock
blade. Both of these planes will take an EXTRA SHARP edge,
which is what I need for the last few strokes. I'm now taking off
something like .001" of material. Each side gets only 3 passes with the
plane. I'll start with the outside and take off any remaining
enamel. I keep flipping the strip until, once again I'm not
removing any material. At this point the strip is about 2 inches
from the small end of the planning from. I'll slide the strip up the form till the tip is aligned with the end of the planing form,
then use the razor
blade as my finishing scraper. (This is a trick I learned from
Tony Spezio of Mountain Home, AR. It works very well.) This
it the only time I start by working from the tip to the butt.
After I work all sides from the tip, I'll start working from the
butt. When I feel the strip is smooth, or I'm not taking any more
shaving, I quit. The picture at the left shows the amount of
shavings I might get when I first start. The picture at the right
shows the last pass I'd make on this strip. If you didn't notice, I've mentioned SHARP more than once. In hand planing, having a SHARP blade is probably the most important single element. Makers have to be on the lookout for tear outs. No matter how expensive the plane, or how well tuned, if the blade isn't SHARP It won't get the job done. I usually sharpen my blades every two or three strips, depending on how many passes I've made through the bamboo, more often if I think the blade needs it. Most problems I have with strips are caused by blades that aren't SHARP enough. I use what's known as "the scary sharp" system, which uses a series of wet and dry sandpaper. Both the angle edge and the back of the blade have to be shiny flat. Experiments have shown me that the 30° used on most bench planes is the correct angle for Bamboo. However Block planes can be ground up to an angle of 45° and even 50°. Each block plane seems to have a personality of it's one. Some block planes work very well at 30° while others only work at 35°. I have one cheep block plane I use as a scraper, that is ground to 70°. But once again I'll end by saying whatever the plane, the blade must be SHARP!
After I finish a strip I store it in a pvc pipe, suspended from my ceiling. That way I know I won't break it by stepping on it or otherwise abusing it.
When I've finished all six strips, I bind them together by hand and
look for any voids between the strips. I correct those by marking
the strip with a Pencil then unbinding the strips again, marking the
side to be fixed by rubbing the pencil over it. Then I put the
strip in the form, marked side up and use a sander till the Pencil
markings are all gone. Now I'm ready to glue the section.